Tuesday, 17 December 2013

Good Luck!!


Materials used:-
Magenta peel off "Cats"
Peel off "Words"
Sakura Stardust pens
12 x 12 silver pearl scrapbook card
6" x 6"  white linen card blank
Black card for layering
All available from:-
www.woodware.co.uk
your local Exmouth stockist is:-
www.japonicadevon.blogspot.com
As the year draws to a close the theme this week is "Good Luck" & let's hope that we'll all have lots of it in 2014. It's all done with peel offs this time & featuring the cute black cats from Magenta. Simply placed onto some white card & coloured with shimmery Sakura Stardust pens with the help of a little water colouring. Cut out the cats (mind their whiskers!!) & mount onto a square of silver card with some foam pads. Now add the Good Luck words & finish with some love in the shape of the Magenta hearts. Happy New Year!
The design team is taking a break for the next 2 weeks but don't worry they will still be loads of great inspiration on the Woodware blog www.woodware.co.uk/blog So may I wish you all a very happy, healthy  & peaceful Christmas. See you all in 2014!


Wednesday, 11 December 2013

December Sketch Challenge


Materials used:-
Craftworks Cards "Christmas Post" paper pad
JGCL 532 Christmas Greetings
1" holly punch
Liquid Pearls
Red & white twine
Buttons
Mark Richards Elements- red
All available from:-
Your local Exmouth stockist is:-
 
One last Christmas card & although it's our usual sketch challenge it's a quick card too. It's all made from the lovely vintage papers of Christmas Post & every panel is a different sheet so they all work well together. I've simply layered onto Christmas green card & embellished with twine, buttons & elements. The robin has been decoupaged, sculpted & attached with some silicone glue. The greeting comes from Jane's Christmas Greetings & is stamped with Versafine Crimson Red & given a touch of sparkle with some Stickles. 
 
Here's the original sketch  

Thursday, 5 December 2013

Coffee & Cream

 Materials used:-
Stampendous CRS5053 Jumbo Forest Friends
JGCL 562 Christmas Greetings
Versafine Vintage Sepia
Detail Clear & Copper embossing powders
Tombow pens
Stickles
Mark Richards "Clusters"
Crafty Edger + Scalloped Flower cassette
12 x 12 Oslo 7 (25661)
Inverted corner punch
A5 cream hammer card blank
Copper mirror card
All available from:-
www.woodware.co.uk
Your local Exmouth stockist is:-
www.japonicadevon.blogspot.com

Just time for one more Christmas card this week, the days are really galloping by now aren't they? Got the sprouts on yet?
Our theme this week (chosen by me I think back in the mists of time) is "Coffee & Cream" & I think it lends itself very well to this gorgeous Forest Friends set which I have been itching to use. The set has some cute animals as well as useful stuff like the stand of trees which I used in last weeks quick cards ( scroll down & take a look) & the very useful pine bough. The set also comes with a mask & stencil which comes in handy for building up a scene. It's not just a Christmas set either as all the pieces could just as well be used for spring or autumn so watch this space for future outings.
I started by embossing the deer & then used the mask to protect him while I stamped the trees in the background. I then coloured with some Tombow pens added some Stickles for a wintry sparkle. Mount onto some copper card & add some gems from the Clusters set- you'll notice I've clipped the corners with an inverted corner punch.
The card blank background has been created from the pine bough stamp & embossed with the copper powder. To finish add a border from the Oslo paper & Crafty Edger & stamp a greeting from Jane's Christmas Greetings set. Happy Christmas!

Here's a closer look at our fawn.

Friday, 29 November 2013

Quick Christmas


Materials used:-
Woodware Base-Its card blanks & envelopes
Card no 1.
Stampendous CRM276 Merriest Wish
Versafine Crimson Red
5 mm Glitterdomes
Zig glue pen & Crystal glitter
 
Card no 2.
Stampendous CRV186 Sacred Silhouette
JGCL562 Christmas Greetings
Detail gold embossing powder
Burgundy organza ribbon
Peel off stars
 
Card no 3
Stampendous CRS5053 Jumbo Forest Friends
JGCL562 Christmas Greetings
Detail gold embossing powder
Crystal glitter
All available from:-
Your local Exmouth stockist is:
 
We all know how it is, you think you have made enough cards when up pop half a dozen more people you haven't sent one to. So our mission this week is some quick & easy cards which look like they have taken hours to make by the untrained eye- right?!
 
I have used the new "Base-Its" for my card blanks as most of the work it already done for you. They are a 6" x 6" 300gsm card & they come in a variety of colours & designs from flourishes, polka dots & vintage swirls but all with an aperture at the centre just waiting for a message or little piece of art.
 
I have chosen an ivory & pink design with some subtle & delicate flourishes at the corners.


 The stand of trees from the Stampendous "Forest Friends" set& Jane's Christmas greetings embossed with gold powder. Add a little sparkle with the crystal glitter


Simply stamp the greeting directly onto the aperture, apply some glitter to frame it & to highlight the flourishes. Add some Glitterdomes.
  

Lastly emboss the  "Sacred Silhouette" onto the aperture using gold powder & add Jane's Christmas Greeting. Finish with some burgundy organza ribbon & some peel off stars.

Each card took around 10 minutes to complete. The whole range of Base- Its is available at Japonica or take a look at the Woodware website to see them all.   

Saturday, 23 November 2013

November Sketch Challenge

Materials used:-
Stampendous HMCR07 Deck the Halls
JGCL 562 Christmas Greetings
"Christmas Post" paper pad by Craftworks Cards
Frantage Hunter Green embossing powder
Shaved Ice, Pearl Mica flakes &  Halo glass glitter
Brilliance Graphite Black
Versamark inkpad
Sakura coloured pencils
Detail clear embossing powder
8" x 8" card blank

Glossy accents
All available from:-www.woodware.co.uk
Your local Exmouth stockist is:-
 
 It's sketch challenge time again & another chance to use one of the cheeky Housemouse stamps from Stampendous. This one is called "Deck the Halls".
As you will see from the original sketch we have 2 ovals on a square card. I realised that I didn't have either a punch or a die which would give me a large enough oval to do my mice justice. You can over come this by die cutting the largest shape & then measuring out the same distance all the way around the shape & joining up the dots. OK so you won't get the crisp outline that you would get with die cutting but this can be disguised as I have done with the luscious Frantage products.
The images have been stamped with Brilliance & coloured with Sakura pencils. I then covered the entire image with Versamark  & embossed with clear powder for a lovely glossy finish.
The background comes from the lovely vintage papers from the "Christmas Post" pad which is an 8" x 8" pad so perfect for entirely covering my card entirely. To finish I've added a "bow" & "ribbon" made from one of the other papers in the pad & added some Glossy Accents to the baubles on the paper to make them really stand out.
 
Here's the original sketch


Monday, 11 November 2013

November Crafty Cardmakers Challenge- Paper Piecing

  
We are pleased to be playing along with the Crafty Card Makers this week, the challenge will be open on their blog for two weeks. If you would like to play along with us please check the Crafty Card Maker rules then use the link on the Crafty Card Makers Blog to add your card or if you are not a blogger yet you can e-mail your card as usual to Dorothy@woodware.co.uk  and I will post it and add it to the Crafty Card Makers Blog.
 
 
Materials used:-
FRS249 Patch Reindeer
Craft Works Card paper pad PP002
"Christmas Post"
Woodware Fancy Twine
Versafine Onyx Black
Woodware Jingle Bells & Wobbler
Brilliance Starlite Silver
Stickles Silver & Christmas Red
Sakura Gelly Roll pens  
Micron pen
All available from:-
Your local Exmouth stockist is:-
 
We're joining the ladies at craftycardmakers for their monthly challenge sponsored by Woodware this week & their theme is paper piecing (not to be confused with paper piercing which is a different animal!)
I've chosen Patch Reindeer from Francoise Read as this is just begging to be pieced. I've used papers from the Craft Works paper pad which has some lovely vintage papers to chose from. Simply select 3 papers which will work well together & stamp the reindeer onto each also onto a plain piece of card to act as the base to assemble the cut pieces. Now cut the pieces & stick them to the base. When complete cut out the whole reindeer & highlight the heart & holly with a Sakura pen.
The dark red A5 card blank has been randomly stamped with snowflakes & a sentiment & Brilliance Starlite Silver from the stamp set & given some sparkle with silver Stickles. I've used a panel from the paper pad at the left hand edge, stamped one of the sentiments from the set & wound some Fancy Twine & Jingle Bells around it  before attaching to the card. 
Rudolph himself has been mounted onto a "Wobbler" which really gives a fun effect. To finish I've stamped the sentiment onto a tag shape & cut some of the holly sprigs from the paper pad  to add to the corners of the card.
 
Pop over & see what the design team at craftycardmakers have been up to


Tuesday, 5 November 2013

Treasured Memories- November's Retailer Challenge

 Materials used:-
JGCL 555 Hours Fly By
JGCL556 Kind Hearts
12 x 12 papers Paris 5 (25675) &
Bremen spotty papers (pink & green)
Basil (pink) 
 Silver pearl
S/A lace, doilies
Liquid Pearls Petal Pink & Flamingo
Stickles Frosted Lace
Organza ribbons ivory & baby pink
Narrow pink satin ribbon
All available from:-
www.woodware.co.uk
Your local Exmouth stockist is:-
www.japonicadevon.blogspot.com

This week it's our monthly challenge set by one of the Woodware retailers & this week we have our lovely friend Christina from A Maze of Memories. With Christina being the queen of scrapbooking I just had to design a scrapbook page this week. Of course almost all scrapbook pages are full of "Treasured Memories" which is Christina's theme.
I have used a lot of punches & one of the new 12 x 12 double sided papers "Paris". The sentiment comes from "Hours Fly By" Jane Gill & the sweet little rose bud comes from "Kind Hearts".
The thing about scrapbooking is that you can just go where the page takes you with a combination of stamping, punches & embellishments. I'd not done any for a long time & I'd forgotten how addictive it can be!! I can feel a scrapbook coming on!!
 Here are all the Woodware punches I used

Wednesday, 30 October 2013

Travel

 
Materials used:-
Stampendous stamps:-
CRP144 I Love Paris
CRW075 London
CRR138 Calligraphy Sampler
CRV138 Life Path
CRR167 Lion Crown
CRW087 Navigateur
CRP184 Grapes
Cream shrink plastic
Brilliance Graphite Black
Versafine Vintage Sepia
Sakura pencils
Pewter brads
6" x 6" ivory linen card blank
All available from:-
Your local Exmouth stockist is:-
Travel is our theme this week & as Cilla would say I've used a lorra, lorra stamps! Time to re visit some of the favourites I've used over the past year or so & all of them very suited to the theme.
So shrink plastic.....you have to use Stazon for stamping on it. Or do you?! Anyone who knows me knows that I hate Stazon with a vengeance, I did get out my pad for this but it was too dry, no re inker, blah, blah, blah oh what a shame!! So you can use Brilliance too but it will take a time to dry I usually leave it over night but if you're really careful in your handling & don't want to colour, the shrinking process will dry the ink. Sorted! I can't believe how all my pieces stamped perfectly the first time  (I was short of shrink plastic so didn't hold out much hope of this happening, you know how it goes!!) & even more amazed when they all behaved in shrinking too! Phew! I just added a little light colour to the images after with some Sakura pencils. 
I stamped the card blank all over using the Calligraphy Sampler & the rest you can see for yourselves from the picture. The use of the old map for the photography was courtesy of Mr Frosty & which I think looks pretty cool but don't tell him I said that!! Bye for now see you next time!  

Thursday, 24 October 2013

Circles, circles

Materials used:-
 FRS305 Bethlehem
1" circle punch (yellow)
Versafine Onyx Black
Stampendous Detail Clear embossing powder
Brilliance inkpads
Water colour paper
Silver Card Candi
Pink mirror card & navy card
A5 cream hammer card blank
All available from:-
Your local Exmouth stockist is:-
Our theme for this week is just "Circles" which covers a variety of options but the first which will pop into many minds is the use of punches- or at least that's what popped into my cold & cough  fogged mind!
 I've chosen "Bethlehem" one of the new Christmas  Singles stamps from Francoise Read which I think is just delightful. Start by taking a piece of water colour paper & emboss the image using Versafine & clear powder. Then colour wash the whole image with a selection of the lovely pearly shades of Brilliance inkpads. Leave to thoroughly dry. Next emboss the image again onto a piece of rich cream card. I then punched circles from the painted piece (heart in mouth moment!!) & then mounted this on top of the cream piece with some DS foam pads, making sure that the art work lines up.
To finish, layer onto first the navy card adding the punched out pieces & then onto the pink mirror card before attaching to the card blank. Add the silver Card Candi for a starry twinkle & a small s/a gem to the star on the cream circle.

Friday, 18 October 2013

October Sketch Challenge

 
Materials used:-
Dreamweaver stencil Scarecrow (LG686)
FRS254 Curly Leaves
Dreamweaver matt white embossing paste
Tombow pens
Detail clear embossing powder
Kaleidacolor Autumn Leaves
Card Candis
1" oak leaf punch
A5 card blank
All available from:-
Your local Exmouth stockist is:-
 

Time to get the Dreamweaver stencils out this week for the October sketch challenge. I've been looking for an excuse to use this cute scarecrow & with the season of harvest/autumn/Halloween upon us I thought he fitted very well. I pasted him onto brown card (pop over to the Dream team at Dreamweaver http://www.dreamweaverstencils.com/  if you aren't familiar with  embossing with pastes &  stencils or have a look at my Blog hop week a while ago). When completely dry I coloured with Tombow pens, however  these do not dry on the embossing paste so to over come this simply cover the image with clear embossing powder & heat to seal in the colours.
For the card background I have stamped with some of the lovely leaves from the "Curly Leaves" set from Francoise Read. I've used a Kaleidacolor pad (Autumn Leaves) which suits the design very well & the sentiment also comes from the stamp set as do the acorns on the strip behind it. To finish I've layered our little scarecrow onto orange & dark red card & added some orange Card Candis with some punched oak leaves for that real pumpkin feel. Happy Halloween.  
 Here's a closer look at the scarecrow

 
The original sketch


Saturday, 12 October 2013

October Retailer Challenge- Monotone Christmas

 
Materials used:-
FRS Twig Tree
Stampendous Detail White embossing powder
Brilliance Graphite Black
A5 white linen card blank
black & white card for layering
All available from:-
Your local Woodware stockist is:-
 
Time for a challenge I think & we have one this week from another of the Woodware Retailers, Janet from craftrange. Monochromatic designs are one of my favourite themes especially for Christmas - well I'm a Pisces I don't make decisions too well!!
 
I've chosen to use one of the new Christmas designs from Francoise Read "Twig Tree" which lends itself very well to the white embossing technique. The most important thing to remember is to give the black card a good wipe with an anti-stat bag to remove any marks which will cause the white powder to cling where you don't want it to i.e speckling. Now simply ink up your stamp with clear embossing ink & off you go- simples!!
I have embossed some hearts (just one of the cute little buttons & icons which come with the stamp set) & cut them & mounted them onto the tree with 3D foam pads.
I have used one of the sentiments from the set to produce a very simple background on the card blank. To complete the design matt & layer the image onto the black & white card before attaching to card blank.
 
Now pop over to Janet's blog at http://craftrangedotcom.wordpress.com/  to see her monotone design. 
 

Monday, 30 September 2013

Alter it, recycle it just don't ignore it!!


Materials used:-
Woodware wooden clock face with movement (15cms)
JGS304 Kim's Coppice
Stampendous CRG071 Oak border
Versafine Vintage Sepia
Tombow pens
Stickles:- Orange Peel & Lime Green
1" oak leaf punch
All available from:-
Your local Woodware stockist is:-
 
Our mission this week is recycle or alter. You know, that plain notebook we've been promising to do something with, that little box you picked up from somewhere & squirrelled away, that wooden photo frame past it's sell by date. They can all be turned into little works of art in their own right.
I've taken one of the new Woodware clocks which have their own working included & instructions as to how to put them together. They are plain wood  so are just begging to be turned in to your own little piece of fun.
I started by cutting a piece of card the size of the base which I stamped with the trees & message with Vintage Sepia. You may want to draw a faint pencil line with the rim piece so that you know that your stamping is going to come within the clock face. As you will notice I haven't bothered with numbers we all can tell the time right?
For the rim of the clock I first gave it a couple of coats of acrylic paint & when completely dry distressed the surface with a Woodware distressing file. I used the cute Oak border again (I just love this stamp!!) and I just tore some strips of card, stamped, coloured & sponged the edges before attaching to the frame. Lastly I added some oak leaves using the punch & a touch of autumn sparkle with some Stickles. all that's left to so now is to assemble the clock when everything is completely dry.
 
Here's a closer look at the face.
 
 
Here's the "naked" clock!


Tuesday, 24 September 2013

Look What I Did With My Magic Stamp!

 
Materials used:-
Magic Stamp
Colorbox Queues chalk inkpads:-
Rose Petals, Misty Meadow & Sand Dunes
Woodware flower buttons
Baby blue polka dot organza ribbon
Peel off 93575 Big Birthday
6" x 6" white card blank
pink, lime & turquoise card for layering
All available from:-
www.woodware.co.uk
Your local Exmouth stockist is:-
www.japonicadevon.blogspot.com
 
A few weeks ago in my "Wonderful World" post I used something called Magic Stamp (or Foam) & this week's theme is devoted to the use of this clever but little used craft product. It's a block of rubbery foam which when heated with a heat tool will retain the impression of whatever is pressed into it. When it cools it will "set" with the impression in place which you can then use to produce backgrounds & original art pieces. The list is endless of the surfaces & objects you can use which include string, buttons, paper clips, foil, lace, gravel, wood, leaves etc. etc ! I warn you once you start you won't want to stop! The neat thing about it is that if you're not happy with what you've produced you simply heat it again & like magic it will disappear. This also means that you can use each block over & over if you don't want to keep your image. If like me you can't bear to part with it it's very reasonably priced so you can have several blocks ready to use.
In the above design I've used a medley of the Woodware flowers buttons. Simply arrange on your craft mat, heat the foam gently until if pressed you can see the indentation of your finger & then press firmly down onto the buttons (or whatever).
I've used some direct to paper to create the coloured background before randomly printing with a darker ink with the block.
Simply layered with complimentary card colours, add some ribbon, the peel off message & some of the actual buttons to  finish. Go on have a go!   
 
Here's my block


Here are a few other effects I achieved while I was playing!


Rose leaves 


Grasses


Japanese maple

Ivy

 
That's all for this week hope you enjoyed a look at a different  technique

Wednesday, 18 September 2013

Crafty Cardmakers September Challenge- Winged Things


Materials used:-
Stampendous CRP211 Angelic Gifts
Magenta Snowflake Branch
Brilliance inkpads:-
Moonlight White, Galaxy Gold, Platinum Planet
Starlite Silver, Pearlescent Sky Blue & Jade
Detail silver embossing powder
Clear embossing pad
Mark Richards Clear Elements
Clear Rhinestone Wave border
Crystal glitter
DL white linen card blank
Silver mirror & navy card
All available from:-
your local Exmouth stockist is:-
 
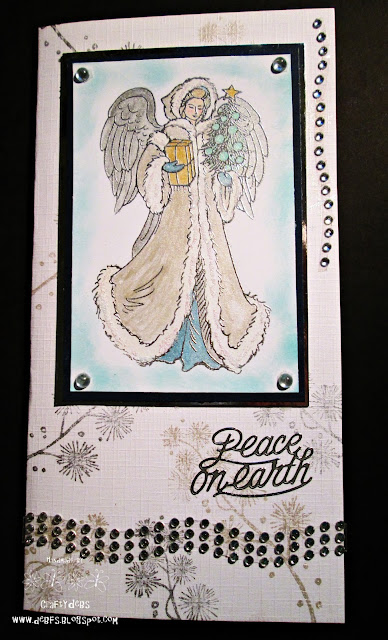
And yet another challenge this week this time hosted by  the ladies at Crafty Cardmakers. Their theme is "Winged Things" which made me think of angels (like you do!) which made me think of......Christmas!!
This sweet stamp is from the new season's stamps from Stampendous. I wanted my look to be delicate, sparkly & ethereal so I have embossed the image with silver & water coloured with inks from the Brilliance pads. I've added some glitter to the fur on the gown of the angel & lightly sponged the edges of the image to make it "pop" a little. Now layer onto silver mirror & navy card. The card blank has been randomly stamped with the Snowflake Branch (which has to be one of my favourite background stamps ever) using Starlite Silver & Platinum Planet. Finish by adding the  crystal embellishments & peel off blessing.
 
Why not pop over to craftycardmakers & see what their design team have come up with.


i 


Sunday, 15 September 2013

September Clarity Challenge- Vintage

This month's challenge is just up my street & I love this stamp which I've incorporated into the background created with the Gelli plate & Leafy swirls stencil. I've used some punched craft  flowers, lace, ribbon, die cut flourishes & gilding flakes.

Thursday, 12 September 2013

September's Sketch Challenge

 
Materials used:-
FRS244 Country Fields
Stampendous CRG071 Oak Border
Brilliance Graphite Black
Versafine Vintage Sepia
Tombow pens
Tartan ribbon
Felt brad
A5 cream hammer card blank
Brown & rust card.
All available from:-
Your local Exmouth stockist is:-
 
Time for this month's sketch challenge, it seems that it all about challenges at the moment but I suppose that's life!! I've stepped away from my Christmas fest for this week (you'll be glad to hear!) & got into the autumnal mood instead even though the weather still thinks it's summer!
I just love this stamp from the new season of Woodware stamps designed by Francoise Read. It's going to be so useful for a whole variety of occasions birthday, new house, thinking of you, get well - you name it.
I've stamped with Brilliance & water coloured with Tombows keeping to very autumnal colours as you will see. I've used the cute little Oak border from Stampendous to frame the main image & on the card blank & layering using Vintage Sepia this time. I'm loving the tartan ribbon which lends itself so well to the colour theme & I've just made a little rosette & secured it at the centre with a Woodware felt brad.
 
Here's the original sketch  


Friday, 6 September 2013

Layers,Layers,Layers!!

 
Materials used:-
Stampendous stamps:-
HMCP02 Candy Joy
CRM 276 Merriest Wish
Copenhagen nos. 1 & 3  12 x 12 scrapbook papers
Versafine Vintage Sepia
Sakura coloured pencils
Detail gold embossing powder + Versamark pad
Paper doily, buttons, Candis, gingham ribbon
8" x 8" card blank
Inverted corner punch
Red & Christmas green card
All available from:-
www.woodware.co.uk
Your local Exmouth stockist is:-
www.japonicadevon.blogspot.com  
 We have another Woodware Retailers challenge this week & it's hosted by scrappyjen. Our theme for the week is just "Layers" which gives me plenty of scope cos I'm a layers kind of gal if you hadn't already noticed!!
OK yes I know I'm doing Christmas AGAIN but we are into September now so I'm allowed!! I just couldn't resist using one of the new Housemouse stamps from Stampendous aren't they cute?!!
I've stamped with Versafine Vintage Sepia which gives such great stamping detail for this type of image. Softly colour with pencils & job done!
Had to use the 8 x 8 card blank to give loads of room for all the layers which really are self explanatory  so I won't bore you with all that. I used the yummy Copenhagen papers which are all double sided & such good value you could go mad & get them all! I used them in my last demo for Francoise' "Patch Reindeer" which turned out great (go to my demo page over on the left side bar & have a look or pop into Japonica for a squiz at the real thing). 
I cheated a little with the sentiment as I only used part of it but it lent itself so nicely to the mischievousness of the mouses! We'll see it in it's entirety in another theme for sure. Then just add the embellishments to finish.  Come on Christmas is knocking very loudly now!! See you soon! Don't forget to visit scrappyjen to see what she's been up to.


Saturday, 31 August 2013

Funny Folds

 Materials used
JGS 316 Christmas Quilt
JGS 317 Many Christmases
Artquest palettes Stargazer & Interference
Kalaidacolor Birthstone
Versafine Onyx Black
Detail Clear embossing powder
Rhinestone border- Triple Wave
All available from:-
www.woodware.co.uk
Your local Exmouth stockist is:-
www.japonicadevon.blogspot.com

Yeah sorry I'm doing Christmas again! Well there's all these lovely new stamps from Woodware & Stampendous & I'm just itching to play with them! Our mission this week is "something with a bit of engineering" to quote our illustrious leader, Dorothy i.e Funny Folds  (the theme for this week that is not Dorothy! )   I've made a "kinetic card" which is fun to play with & has a lot of potential once you have the mechanics right. I've started with an A4 sheet & I think you'll be able to see from the  photo below how to achieve the blank. 


OK? If you want any more help call in at Japonica & we have some copies of the template we'd be happy to let you have.
 
For the stamping I have used Versafine & embossed with clear powder. The colour is provided by the Artquest Mica palettes & I have chosen colours which compliment the colours of the Rhinestone border. The clear embossing "holds" the thick pearly paint in place so that you maintain a solid black outline. Both stamps used are the new season single stamps & both are background/samplers. Some of you may have seen me used Christmas Quilt in my demo the week before last (whiz over to my demo page, click on Deb's Demos over on the left side bar) & it certainly is a versatile stamp. This time I've chopped it up & used it as the main feature & as icons on their own too. The left hand centre panel is the other single stamp from Jane Gill "Many Christmases" which I have printed with Birthstone & again just used a piece of it. Now just add the bling! I just love these s/a sparkly borders there are some pretty pearly ones too. That's all for this week bye for now! 


Wednesday, 21 August 2013

WOYWW 220

Morning everyone hope all's well in your world today. Here's my desk & I've been having a great time with my new Gelli plate. So you can see my first attempts which I was really pleased with now I'm itching to get more stencils & try other techniques- think it's going to be addictive!! Won't have too much time to play until next week but I've got a long car journey this weekend to dream up ideas.
Here's a closer look at 2 of my favourite results. Think the slant of sunlight gives it extra effect!


 Here's a look at the finished bunting I was working on last week for sis in law's birthday bash this weekend- hope it doesn't rain!! Bye for now see you next week.


Monday, 19 August 2013

Girlie Things!

Materials used:-
Stampendous
 CRN138 All Good Things
CRE202 Birthday Calories
CRE 187 Simply The Best
SSC 1042   Paisley Spring
F136 Dessert First
Woodware
JGCL545 Girl Stuff
JGCL 536 Chocaholic
JGS262 Birthday Background
FRS 204 Giant Cupcake
FRCL117 Getting Married 
Brilliance graphite black & moonlight white
Stazon black 
12 x 12 Basil papers
shrink plastic
Candies
Tombow, Sakura Stardust & Gelly glaze pens
S/A pearls, pewter stud brads. baby blue narrow organza ribbon
All available from:-
Your local Exmouth stockist is:-
 
When you think of your girlfriends & time spent with them what do you think of? A glass (or three!) of wine? Chocolate? Shopping? Shared "power surges"? Or maybe all of the above!! I've had one of my turns this week & gone stamping mad again! Once I started I couldn't stop & just kept thinking of another & another stamp which would suit our theme  this week so well.
I've made a little "handbag" from Basil a papers which I have stamped with Paisley Spring & decorated with Candies (the flower fastener is made from Candies too), pearls, strips of contrasting papers cut with the Fingerguard trimmer & pinking blade & Sakura pens.
 
Inside I've made a little fun scrapbook which I hope would make the recipient smile. I cut 3 4" lengths from the basil paper & joined them together to make a concertina book. The individual panels are self explanetry - just enjoy!!


The surprise  inside!


Couldn't put it better myself!


The surprises unfold!


My sentiments exactly!
Strike a cord anyone?!!
 

How true!!


Hope you enjoyed this fun project & that it inspired you to get those stamps out! Bye for now I'd love a comment just to prove I'm not talking to myself!!