Monday 30 September 2013

Alter it, recycle it just don't ignore it!!


Materials used:-
Woodware wooden clock face with movement (15cms)
JGS304 Kim's Coppice
Stampendous CRG071 Oak border
Versafine Vintage Sepia
Tombow pens
Stickles:- Orange Peel & Lime Green
1" oak leaf punch
All available from:-
Your local Woodware stockist is:-
 
Our mission this week is recycle or alter. You know, that plain notebook we've been promising to do something with, that little box you picked up from somewhere & squirrelled away, that wooden photo frame past it's sell by date. They can all be turned into little works of art in their own right.
I've taken one of the new Woodware clocks which have their own working included & instructions as to how to put them together. They are plain wood  so are just begging to be turned in to your own little piece of fun.
I started by cutting a piece of card the size of the base which I stamped with the trees & message with Vintage Sepia. You may want to draw a faint pencil line with the rim piece so that you know that your stamping is going to come within the clock face. As you will notice I haven't bothered with numbers we all can tell the time right?
For the rim of the clock I first gave it a couple of coats of acrylic paint & when completely dry distressed the surface with a Woodware distressing file. I used the cute Oak border again (I just love this stamp!!) and I just tore some strips of card, stamped, coloured & sponged the edges before attaching to the frame. Lastly I added some oak leaves using the punch & a touch of autumn sparkle with some Stickles. all that's left to so now is to assemble the clock when everything is completely dry.
 
Here's a closer look at the face.
 
 
Here's the "naked" clock!


Tuesday 24 September 2013

Look What I Did With My Magic Stamp!

 
Materials used:-
Magic Stamp
Colorbox Queues chalk inkpads:-
Rose Petals, Misty Meadow & Sand Dunes
Woodware flower buttons
Baby blue polka dot organza ribbon
Peel off 93575 Big Birthday
6" x 6" white card blank
pink, lime & turquoise card for layering
All available from:-
www.woodware.co.uk
Your local Exmouth stockist is:-
www.japonicadevon.blogspot.com
 
A few weeks ago in my "Wonderful World" post I used something called Magic Stamp (or Foam) & this week's theme is devoted to the use of this clever but little used craft product. It's a block of rubbery foam which when heated with a heat tool will retain the impression of whatever is pressed into it. When it cools it will "set" with the impression in place which you can then use to produce backgrounds & original art pieces. The list is endless of the surfaces & objects you can use which include string, buttons, paper clips, foil, lace, gravel, wood, leaves etc. etc ! I warn you once you start you won't want to stop! The neat thing about it is that if you're not happy with what you've produced you simply heat it again & like magic it will disappear. This also means that you can use each block over & over if you don't want to keep your image. If like me you can't bear to part with it it's very reasonably priced so you can have several blocks ready to use.
In the above design I've used a medley of the Woodware flowers buttons. Simply arrange on your craft mat, heat the foam gently until if pressed you can see the indentation of your finger & then press firmly down onto the buttons (or whatever).
I've used some direct to paper to create the coloured background before randomly printing with a darker ink with the block.
Simply layered with complimentary card colours, add some ribbon, the peel off message & some of the actual buttons to  finish. Go on have a go!   
 
Here's my block


Here are a few other effects I achieved while I was playing!


Rose leaves 


Grasses


Japanese maple

Ivy

 
That's all for this week hope you enjoyed a look at a different  technique

Wednesday 18 September 2013

Crafty Cardmakers September Challenge- Winged Things


Materials used:-
Stampendous CRP211 Angelic Gifts
Magenta Snowflake Branch
Brilliance inkpads:-
Moonlight White, Galaxy Gold, Platinum Planet
Starlite Silver, Pearlescent Sky Blue & Jade
Detail silver embossing powder
Clear embossing pad
Mark Richards Clear Elements
Clear Rhinestone Wave border
Crystal glitter
DL white linen card blank
Silver mirror & navy card
All available from:-
your local Exmouth stockist is:-
 
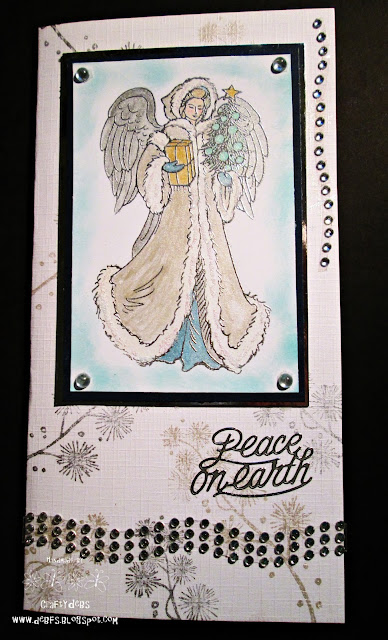
And yet another challenge this week this time hosted by  the ladies at Crafty Cardmakers. Their theme is "Winged Things" which made me think of angels (like you do!) which made me think of......Christmas!!
This sweet stamp is from the new season's stamps from Stampendous. I wanted my look to be delicate, sparkly & ethereal so I have embossed the image with silver & water coloured with inks from the Brilliance pads. I've added some glitter to the fur on the gown of the angel & lightly sponged the edges of the image to make it "pop" a little. Now layer onto silver mirror & navy card. The card blank has been randomly stamped with the Snowflake Branch (which has to be one of my favourite background stamps ever) using Starlite Silver & Platinum Planet. Finish by adding the  crystal embellishments & peel off blessing.
 
Why not pop over to craftycardmakers & see what their design team have come up with.


i 


Sunday 15 September 2013

September Clarity Challenge- Vintage

This month's challenge is just up my street & I love this stamp which I've incorporated into the background created with the Gelli plate & Leafy swirls stencil. I've used some punched craft  flowers, lace, ribbon, die cut flourishes & gilding flakes.

Thursday 12 September 2013

September's Sketch Challenge

 
Materials used:-
FRS244 Country Fields
Stampendous CRG071 Oak Border
Brilliance Graphite Black
Versafine Vintage Sepia
Tombow pens
Tartan ribbon
Felt brad
A5 cream hammer card blank
Brown & rust card.
All available from:-
Your local Exmouth stockist is:-
 
Time for this month's sketch challenge, it seems that it all about challenges at the moment but I suppose that's life!! I've stepped away from my Christmas fest for this week (you'll be glad to hear!) & got into the autumnal mood instead even though the weather still thinks it's summer!
I just love this stamp from the new season of Woodware stamps designed by Francoise Read. It's going to be so useful for a whole variety of occasions birthday, new house, thinking of you, get well - you name it.
I've stamped with Brilliance & water coloured with Tombows keeping to very autumnal colours as you will see. I've used the cute little Oak border from Stampendous to frame the main image & on the card blank & layering using Vintage Sepia this time. I'm loving the tartan ribbon which lends itself so well to the colour theme & I've just made a little rosette & secured it at the centre with a Woodware felt brad.
 
Here's the original sketch  


Friday 6 September 2013

Layers,Layers,Layers!!

 
Materials used:-
Stampendous stamps:-
HMCP02 Candy Joy
CRM 276 Merriest Wish
Copenhagen nos. 1 & 3  12 x 12 scrapbook papers
Versafine Vintage Sepia
Sakura coloured pencils
Detail gold embossing powder + Versamark pad
Paper doily, buttons, Candis, gingham ribbon
8" x 8" card blank
Inverted corner punch
Red & Christmas green card
All available from:-
www.woodware.co.uk
Your local Exmouth stockist is:-
www.japonicadevon.blogspot.com  
 We have another Woodware Retailers challenge this week & it's hosted by scrappyjen. Our theme for the week is just "Layers" which gives me plenty of scope cos I'm a layers kind of gal if you hadn't already noticed!!
OK yes I know I'm doing Christmas AGAIN but we are into September now so I'm allowed!! I just couldn't resist using one of the new Housemouse stamps from Stampendous aren't they cute?!!
I've stamped with Versafine Vintage Sepia which gives such great stamping detail for this type of image. Softly colour with pencils & job done!
Had to use the 8 x 8 card blank to give loads of room for all the layers which really are self explanatory  so I won't bore you with all that. I used the yummy Copenhagen papers which are all double sided & such good value you could go mad & get them all! I used them in my last demo for Francoise' "Patch Reindeer" which turned out great (go to my demo page over on the left side bar & have a look or pop into Japonica for a squiz at the real thing). 
I cheated a little with the sentiment as I only used part of it but it lent itself so nicely to the mischievousness of the mouses! We'll see it in it's entirety in another theme for sure. Then just add the embellishments to finish.  Come on Christmas is knocking very loudly now!! See you soon! Don't forget to visit scrappyjen to see what she's been up to.