Wednesday, 28 December 2011

A Special Thank You

Shopping List
Woodware Clear Magic-
FRCL 159 Flower Doodles &
FRCL 009 Must Have Retro Words
Gold Metal Quilting Sheet
Magenta Memor 221 Pretty Gourds
Orange Elements
Black Stazon
Black Versafine
Embossing tool
Fingerguard trimmer with pinking blade
All available from:-

So we come to the last card of the year & time to say "Thank you " for all those lovely Christmas gifts. I have used 2 Clear Magic sets by Francoise Read, Flower Doodles & Must Have Retro Words. I have stamped the flower design & the sentiment onto some Metal Quilting sheet using black Stazon. I have then embossed the design using a ball embossing tool by following the black line on the front of the piece & then turning it over to emboss just inside the etched line on the back. This way a raised "quilted" effect is acheived. Using a cream card blank I have then layered each piece onto a piece of black card & mounted the 2 designs onto a piece of "Pretty Gourds" scrapbook paper from Magenta. I have then stamped some of the pretty flourishes that come with the Flower Doodles set & added some orange Elements to finish off our simple "Thank You" card.

Thursday, 22 December 2011

The Richness of Red

Shopping List
Clear Magic FRCL171 All Through the Year
Silhouette Embossing punch
Woodware velvet paper
Crafty Edger + Zig Zag Diamond cassette
Metal Quilting sheet in silver
Black Stazon
Black self adhesive gems
S/A diamantes (coloured red with permanent markers)
Red Stickles
Versafine Onyx Black
Clear embossing powder
Fingerguard trimmer with a scalloped blade
All available from:-

At this time of the year with all the Christmas crafting that has been going on it's easy to put aside other important card making occasions like anniversaries & birthdays.  I've used our theme this week, "The Richness of Red" to design an anniversary card with a Christmas glow to it. I have used a red pearlescent card for my card blank onto which I have stamped & clear embossed the anniversary wishes from Francoise Read's Clear magis set "All Through the Year". For the main panel at the bottom left of the card I have passed a piece of silver Metal Quilting sheet through an embossing folder & then "aged" it with black Stazon. I've used the Silhouette Embossing punch to produce the heart duos from some red velvet paper, red card (to which I have then applied red Stickles) & some of the silver metal sheet. The border at the right hand edge of the card was produced with the Zig Zag Crafty edger cassette which creates some lovely & very useful cut outs. The border has been mounted onto a piece of siver pearlescent card which has been trimmed using the Fingerguard trimmer & a Scalloped blade. Now just add the gems to finish the design- Happy Anniversary!

Friday, 16 December 2011

A Happy Birthday in a Tin!


Shopping List 
FRCL 129 Garden Greetings
Woodware Scrapbook in a tin
Tombow pens
Sakura Stardust pens
Woodware mini punches
(daisy, heart,sunburst,pot plant)
Woodware 1.5" punches
(Oak leaf, Monstera, daisy)
Extra large scalloped circle punch
Leonie Em punches
Stazon inkpads
Woodware paper flowers
Elements
All available from:-

Our theme this week is "Look What I Did With My Tin" & look what I did with mine!I've had a great time with Francoise Read's gorgeous Clear Magic Garden Greetings set. There are just so many lovely sentiments to suit any occasion I just couldn't choose-so I used them all!! This is a card in a tin for that keen gardener or just to remind you of those lovely flowers of summer. There are some pretty flowers, butterflies & othre gardening icons to add embellishment to your design.  I've sponged the entire scrapbook with a soft lime chalk inkpad & then stamped the sentiment with a dark red chalk inkpad. I have stamped the various areas of artwork with a darker green inkpad and coloured them using Tombow & Sakura Stardust pens. I have used various punches to add embellishment to my pages. I have inked the lid of the tin with a mix of brown & red Stazon inkpads & have added a central scalloped card circlestamped with the little flower spray from the stamp set. I have finally added two paper flowers sponged witha dark pink ink. The outer edges of the tin have been embellished with punched daisies & lime green elements. Below you can see the various "pages" of the birthday scrapbook in a tin. 


Saturday, 10 December 2011

Tis the Season....!

Shopping List
JGS260 Festive Background
Stampendous Detail Gold embossing powder
Stampendous Tuscany embossing kit (EK04)
Woodware ass. bottons
Metals
Elements
Burgundy organza ribbon
Craft card
Versafine inkpad
Embossing inkpad
Gold, cream & Christmas green card for layering
All available from:-

Time for our monthly sketch challenge & my final Christmas theme for this year. I decided to create a slightly more masculine look for the festive season with our nearest & dearest in mind. Jane Gill's big single stamp Festive Background is just perfect for this. This design lends itself  beautifully to a number of different techniques especially embossing. I have embossed the cream panel with a mix from the Tuscany embossing kit from Stampendous with a little Detail Gold added. For the background layer I have used just Detail Gold on Christmas green card. Even though this is a masculine card we can still add some richness & texture in the form of buttons, Metals, Elements & even a touch of ribbon doesn't go amiss. All the layers are mounted onto a Craft card blank which I have also stamped with the Festive Background stamp. Happy Christmas to your special someone! 


This is December's sketch to follow so why not join in this month's sketch challenge. If you don't blog you can e mail your entry to Dorothy dorothy@woodware.co.uk


Monday, 28 November 2011

Gift tags for all the family

Shopping List
Punches
Christmas Combination
Christmas Assortment
Very Big  Scalloped Circle
Super Duper Circle
Price Label
Single Holly
Blink Blink
Clear Magic FRCL171 All Through the Year
Holly brads
Santa Hat brads
Metals, Elements,Sparkler peel offs
Organza & gingham ribbon
Brilliance & Versafine inkpads
Crafty Edger + Antique Floral cassette
Small pieces of Magenta papers
All available from:-

Gift tags for all the family this week & I really got carried away I'm afraid. This is a great way to use  those carefully saved precious scraps of card, paper, ribbon & other treasures. I've used a whole selection of Woodware punches & the Francoise Read Clear Magic set "All Through the Year" was ideal for the words on my tags. I love the Holly Sprig brads & the Santa Hat brads that are new this year from Woodware, also the new single holly leaf 1" punch. It's a good opportunity to employ your Crafty Edger or border punches to give a lacy effect to the paper pieces. You can really go to town with Metals, Elements, Stickles & Sparkler peel offs to give those unique finishing touches & sparkle to your personalised tags.     

Tuesday, 22 November 2011

Pick a colour........

Shopping List
Stampendous Cling Forest Cottage Scene CRR123
Woodware Clear Magic JGCL551
1" snowflake punch
Versafine inkpad
Brilliance Pearlescent Purple inkpad
Sakura Metallic pen in purple
Stickles Purple & Stardust
Lilac polka dot organza ribbon
Purple card
Lilac pearlescent card
Dark purple ribbed card
All available from


Time is marching steadily on towards Christmas & only so many crafting days to go! I've kept it simple this week & returned to my favourites- Stampendous stamps. Here we have a snowy log cabin scene which I have stamped using Brilliance Pearlescent Purple. I have used the inkpad & a Sakura metallic pen in purple to watercolour the image. I have layered onto the dark ribbed card and then onto the pearl lilac card onto which I have stamped my message. The message comes from Jane Gill's clear magic stamps, Christmas Verses, which I have used  for all my card messages & inserts this year as it's just so versatile & is suitable for any design. I have added a border of punched snowflakes & some dots of Stardust Stickles to give the snowy effect in the scene & a dot of purple Stickles at the centre of each snowflake. A little knot of lilac polka dot ribbon just finishes the card.        

Thursday, 17 November 2011

Hobby Art weekend

Last weekend we enjoyed having Jenny Mayes from Hobby Art with us. Jenny's workshops are always in great demand & this time was no exception. Jenny was working with Hobby Arts new sets of clear stamps which included some new "Scene It" designs. She was also with us all day on Saturday demonstrating at Japonica & it proved to be a very busy day all round.


Here's Jenny at the end of a very long & busy day with our own Janet Caudrelier of Japonica

To launch our November offer of the month I was demonstrating a few weeks ago using one of the new Hobby Art set which is part of our offer & below are a few of my designs.


Wednesday, 16 November 2011

Traditional Christmas

Shopping List
Woodware Singles Clear magic stamp
Holly Wreath FRS102
Christmas Verses JGCL551
Magenta 12"x12" paper
Holiday Poinsettias-memor 34
Holly sprig brads JL 146
Sakura metallic gel pens
Woodware Elements in red
Stickles Diamond
Versafine inkpad in Onyx Black
Clear embossing powder
Woodware paper trimmer with pinking blade
Woodware inverted corner rounder
All available from:-


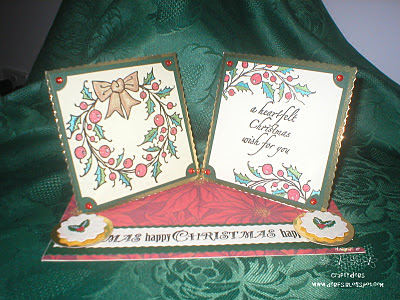
We have a double twisted eisel card this week for our theme of Traditional Christmas. This has been created from a 8"x8" piece of card folded in half and the cut down the centre of the top half. Simply fold the two centre corners away from the  centre- a little like a shirt collar. The two  art pieces will fit onto these two folds. I have stamped all images in black ink and embossed with clear powder. Using the rich metallic Sakura pens I have watercoloured the images. As you will spot I have stamped part of the wreath to provide a flourish at the top and bottom of the message panel. Both pieces have been layered into dark green card & then gold card having used the inverted corner  punch first. The bottom half of the card has been covered with the Poinsettia paper and I have stamped a message border to act as the stop bar to the two eisel pieces. I have used the cute Holly brads on two layers of die cut circles to make some "mince pies". Add some frosting with Stickles and the red Elements to complete our Traditional Christmas theme.  

Thursday, 10 November 2011

Angel Kisses

Shopping List
Stampendous Cling CRV 162 Manger Kisses
Stampendous Cling CRL 077 Snowflake Kisses
Bremen scrapbook paper (no 5)
Woodware 1" punches Holly & Snowflake
Clear Elements
Woodware paper flowers
Woodware Christmas paper lace
Double sided adhesive sheet
Blue superfine glitter
Small diamantes
Crafty Edger with Scallop Shell cassette
Stickles Stardust
8"x8" Woodware card blank
Versafine Onyx black
Brilliance Mediterranean Blue
All available from:-

For this month's sketch challenge I have used some adorable Stampendous cling stamps and one of the new large 8"x8" Woodware card blanks. These are great as they give you so much room to be creative & really make a special card for that special someone. I have used some of the pretty Bremen scrapbook paper with the edges punched using the Crafty Edger & the Scallop Shell cassette which I feel also has the feel of snowflakes. There are 2 smaller borders at the top & bottom of the card created by adding a strip of double sided adhesive sheet onto which comes the snowflake design paper lace & all topped off with a sprinkling of Ultrafine blue glitter. I have stamped our cute angels using Versafine Onyx Black inkpad & softly coloured the images with pencils. This was layered onto silver mirror card and clear Elements added around the scalloped edge.The paper flower was sponged with the blue inkpad & added sparkle was acheived using Stickles Stardust. As you will see from the original sketch above, I have cheated slightly by creating the curved border in the centre of our challenge with  punched snowflakes embellished with small diamantes. Lastly I have added some punched holly leaves and clear Elements  for those final frosty touches.  

Friday, 4 November 2011

Pick up a penguin!

Shopping List
Woodware peel offs
90114 Penguins in black
90100 Snowflakes micro glitter silver/silver
Christmas Verses-JGCL551
Candy bonbons
Crystal glitter
Sakura gel pens
 Double sided adhesive sheet
Small diamantes
Versafine inkpad
All available from:-

Our theme this week is to use just one layer which is so hard to do when you're a matting & layering junkie like me. I've chosen this effective black peel off as you just can't have Christmas without a  penguin or two can you? I've placed the peel off directly onto the two outer sides of  a A4 trifold card blank and stamped the greeting from Christmas Verses onto the centre panel.I've used a different greeting from the same set along the top and bottom of the card. Cover this with a strip of DSA sheet, randomly add some small diamantes & then sprinkle with crystal glitter to give the whole border a frosty effect. Beware that you must use crystal glitter as any other will oscure the whole image. I have coloured the penguin scenes with Sakura gel pens and again sprinkled with crystal glitter.For the final touches I have added  some sparkling snowflakes with sky blue Candy Bonbons in the centres of some. Brrrrr!!


Saturday, 29 October 2011

Spooks & Treats

Shopping List
Stampendous Peel Offs
90895 Spiders Web
90896 Cats & Bats
93211 Bats
all in black
Stickles Orange Peel
Orange & black card
Thin strip of acetate
Black cotton
Sakura gel pens in metallic silver & black
Black 3D foam pads
We're getting ready for Halloween this week & I certainly had fun creating this card. You will need 2  6"x6" card blanks in orange. The first is folded in half as usual.Turn the second over after folding & fold the 2 outer edges in to meet the centre, as in a concertina. You then need to cut a circular aperture from the centre approx 3.5" in diameter. I have decorated the front of the card using a selection from the 3 different peel offs to created a "spooky" scene. The 2 cats at the bottom left hand corner have been stuck onto black card & cut out. The smaller one has been mounted with black foam pads & the larger one mounted onto a small strip of  concertina acetate. This gives a fun springy movement. I've used the orange Stickles to highlight the cats & spiders eyes & the widows of the haunted house. For the inner card  I have stuck some of the bats randomly down the edges of the card & some smaller ones behind the aperture.I have mounted the large hanging bat onto black card & cut out & then suspended him using black thread. I have used a watercolour wash using sakura pens in metallic siver & black to give the  effects to the background & the webs. Tiny spiders dancing around the edge of the  aperture & some spooky messages finishes the inner card. Now just fix the inner card to the inside of the outer card along the edges only to acheive the pop out look & that spooky surprise.

  Here's the inside of the card- scary!

Tuesday, 25 October 2011

12th Special Edition Workshop at Japonica

Last monday saw us holding our 12th Special Editionworkshop and as always a great day was had by all as you will see from the photos of all the ladies crafting away below!


We were fortunate to have a veritable wealth of crafting expertise among our tutors this time as we were able to welcome Francoise Read, Jane Gill, Vera Moore and our own Janet Caudrelier. A wide range of products and techniques were used and a chance to sample and use first hand some of the new stamps and products that were introduced to Jan and I when we went to the Woodware retailers workshop event in Yorkshire at the beginning of September. Japonica's twice yearly workshops seem to get better with each one with the bar being set higher and higher by our crafting customers. We look forward to our next one in March next year when we shall look forward to seeing Francoise again-places are going rapidly as always so be sure to put your name down soon!  


Monday, 17 October 2011

Blue Christmas

Shopping List
Artemio clear stamps Snowmen
Versafine Onyx Black
Sakura Stardust Jelly Roll & Metallic pens
Stampendous Rainbow embossing powder
Peel off chain letters  Let it Snow
Stickles Diamond
Acetate
All available from http://www.woodware.co.uk/

We're really into the Christmas crafting season now & I've been itching to try out this cute set of stamps from Artemio.  I have used an overlay of acetate onto which I have attached the bottom layer depicting the row of snowmen.I've stamped onto white hammer finish card which I think is great for suggesting the texture of snow. I've water coloured them with Sakura pens in various shades of blue. On the outside of the card blank I have stamped the snowy street scene in a dark blue ink and again used Sakuras to add some detail. I've also used some Stickles glitter glue to give some frosting & added the Let it Snow peel off which I have also used on the snowman layer. I have cut the top of the card away just above the skyline to expose the inner layer of the card. On this layer I have grouped together 3 of the snowflake stamps with I have stamped in a dark blue ink & embossed with Rainbow embossing powder to give them some sparkle. I have coloured the large snowflake & detailed the others with a Sakura Metallic pen in silver. A few sparkly snowdrop peel offs on the front of the acetate layer just helps to link it all together. Happy Blue Christmas!


Tuesday, 11 October 2011

Flock flowers

Shopping List
Set of 3 Woodware paper mache boxes
Artemio Silhouette Flowers clear stamp set
Stampendous flock powders in:-
Olive You
Sunshiny Yellow
Citrus Orange
Indigo Blue
Chocolate Lotto
Cataloupe Orange
Stampendous pearl glitter Tiger Lily
Double sided adhesive sheet
Woodware craft wire
Woodware buttons
Gold brads
Caviar beads gold & copper
Brown, burgundy & pale gold organza ribbon
Gold Mica paint  
Memory mists in copper, silver & gold
Punch craft tools used:-
Double ended etching tool (DEET)
Character shaper 
All available from http://www.woodware.co.uk/

I'm working with flock this week & thought I'd take a break from card making for a while to get creative with this set of 3 different sized boxes. I've used Artemio's SilhouetteFlowers stamp set to give me my flower & leaf shapes. I've stamped onto paper the same colour as the flock I have chosen to use, placed the image onto a piece of double sided adhesive sheet & cut out my flower or leaf. I have used the DEET & Character Shaper to give the rounded shape to the petals & some veining to the leaves. I have treated the boxes with a mixture of layers of Mica paint  & Memory Mists spray which I have then wiped & sanded to give the aged, distressed look. I've added the flowers & leaves & embellished with brads, caviar beads & buttons. As you will see I have used a mix of flock colours on some of the flowers & leaves & I've added some glitter also to the small box. I've acheived the worn, tattered effect with the ribbons by heating very gently with a heat tool. Be very cautious if you try this as the ribbon does shrivel very easily but this is also a good technique to use to seal the ends of ribbon that is going to be handled a lot. Here are the individual boxes hope youlike them.


Wednesday, 5 October 2011

Wrinkles?What wrinkles?!

Shopping List
JGCL545-Girl Stuff
Bremen scrapbook paper
Flock pastel brads
Self adhesive lace
Versafine
Narrow satin ivory ribbon
Sakura gel pens
Coloured pencils
All available from:http://www.woodware.co.uk/

It's sketch challenge week again & I've used this fun set of stamps by Jane Gill which will bring a smile to the lips of all us ladies "of a certain age"! I've stamped onto the spotty side of the Bremen  scrapbook paper & used the flock brads, ribbon & self adhesive lace to give a real feminine, girly feel. We're all girls at heart, whatever our age.........right?!!   

Here's the original sketch that I worked from why don't you have a go & see what you come up with- anything you like! 

Thursday, 29 September 2011

Something for the Boys


Shopping list
Artemio hexagonal die cut mini album template
(18002014)
Stampendous cling sentiments:-
CRV151 Life Path
CRM222 Confidant Graduation
CRN138All Good Things
CRE187 Simply The Best
CRL249 Love Friends Health
SSC1052 Hugs For All
Magenta memor 238 Peace
Woodware Big flourish punch
Big circle punch
Super circle punch
Versafine ink pad
Copper nailheads
All available fromhttp://www.woodware.co.uk/

Something for the boys this week & a mini scrapbook album for a brand new proud dad. I've used the Artemio template to cut the mini album from a double sided Magenta scrapbook paper which compliments the colours in the photos. I have used Big & Super cicle punches to select parts of the photos to feature in different sections of the album. As always Stampendous sentiments provide just the right words & I have used the Big flourish punch & some copper nailheads to provide some masculine embellishment. The perfect memento for a besotted dad!


Friday, 23 September 2011

Colours of Autumn

Shopping List
Artemio -Silhouette Foliage
Stampendous CRE187- Cling Simply the Best
Brilliance ink pads:-
Pearlescent Poppy
Pearlescent Beige
Pearlescent Rust
Cosmic Copper
Rocket Red Gold
Ladybug embellishments
Organza ribbons in pale gold, burgundy & terracotta
All available from http://www.woodware.co.uk/

Summer is behind us now & autumn well & truly here bringing with it magnificent colours which is our theme this week. I have used this Artemio clear stamp set which has some lovely foliage silhouettes & some pretty flowers too which would lend themselves just as well to spring or summer themes. These solid images can be used with inkpads as I have done here or by applying colour with marker pens directly onto the stamp. I have stamped with a variety of Brilliance ink pads in autumnal colours onto cream linen card layered onto burgundy, orange & red card. I have created my own card blank by cutting a piece of A4 card horizontally & folding approx 2" in from the right side & then the left side in to meet that. I have joined the 2 pieces of card at the back so I have stamped a cream layer of card to go inside to hide the join & strengthen the card blank. I have tied the 3 pieces of ribbon together over the right hand panel & tattered the ends to give a fringed effect. The cute ladybug embellishments & a Stampendous sentiment complete the design.


Saturday, 17 September 2011

Sugar & Spice

Shopping List
Woodware Clear Magic JGCL536-Chocaholic
Stampendous Cling stamp CRN138 All Good Things
Large corner rounder
Versafine Onyx Black
Watercolour pencils
Organza ribbon
Gingham ribbon
Double sided adhesive sheet
Ultra fine glitters
Acetate
Glossy accents
Woodware stapler
All available fromhttp://www.woodware.co.uk/

Sugar & spice & all things nice......like chocolate & we girls love our chocolate don't we? It was time to make a shaker card this week, I haven't done one for ages. I've borrowed an original idea from my good friend Jan Caudrelier for the sugar strands as the filling for my shaker panel but honestly I just couldn't think of anything better to go with the theme of this week. I have used Jane gill's lovely set of stamps "Chocaholic" & I just love all the cheeky messages that come wiht this set. We've all got those pieces of ribbon which are much too pretty to throw away & will surely come in handy one day haven't we? Here's a fun way of using up those scraps. just staple them to the edge of your card with the Woodware stapler & which comes with coloured staples. I've shortened the front right hand edge of the card to reveal  a border which i have acheived with a strip of double sided sheet & random rainbow coloured glitters. I've given the chocolates a glossy finish with a thin coat of Glossy Accents & the Stampendous sentiment inside the card just adds the finishing touch!Yummy!

Thursday, 15 September 2011

I'm soooo excited!!

I'm off to Yorkshire for the weekend for the Woodware retailers 2 day workshop event! Jan & I are off on Saturday & will be staying overnight in Chestfield before being up bright & early on Sunday morning to get to Skipton, the headquarters of Woodware. Over the next 2 days we'll be taking part in workshops held by Francoise Read, Jane Gill & the ladies from Stampendous & Dreamweaver. I'll also get to meet Dorothy Adam who is the co ordinator of the new Woodware blog. There will be 4 members of the blog design team under one roof at the same time so that will be exciting. I'm going to come back buzzing with ideas that I can't wait to try out! Watch this space!

Monday, 5 September 2011

Spring Sprigs

Shopping List
Stampendous CRV153 Cling Spring Sprigs
Clear Magic FRCL171-All Through the Year
Versamark pad
White embossing powder
Chalks
Chalk inkpad
Woodware lever border punch Spring Ribbon
White organza ribbon

Wouldn't it indeed be nice to be thinking about spring instead at the fast approaching autumn? It's our 4th sketch challenge this week & I've chosen this delicate stamp by Stampendous to give us that last taste of summer before we're looking at the magnificent colours of autumn.I have used the stamp to create the background on the card blank by ramdomly stamping and embossing the image with white embossing powder. I have then sponged over the entire area with a sky blue chalk inkpad. For the centre piece I have stamped the image using a Versamark clear sticky pad & then highlighted the  flowers, grasses & stems with chalks. A central panel created by using the Ribbon Spring border punch, & a sentiment from the Clear Magic set completes the card.  


Tuesday, 30 August 2011

DREAMWEAVER BLOG HOP!


Shopping List
Dreamweaver stencils:-
 Birthday Words LG704
Flower in Bottle LL566
black embossing paste
Mica powders
Memory Mists Silver Metallic
 & Bright Gold
Woodware Sparkler peel offs (Dragonflies & Butterflies)
Purple organza ribbon (narrow)
All available from Woodware

It's Dreamweaver week this week -I just love that name don't you? I've created a card & co- ordinating bookmark this week using stencils, embossing paste & Mica powders & Memory Mists. I have used the same stencil for the main image in conjuction with the black embossing paste & Mica powders & again with Memory Mists for a softer muted effect on the bookmark. Secure the stencil to a piece of white card using masking tape & apply a layer of the embossing paste with the flat of a pallet  knife to cover the entire stencil then remove the excess. Carefully remove the stencil & leave the image to dry. Place the stencil over the image when dry & apply Mica powders. The birthday greeting was created in the same way. I have then layered the image onto black & white card & embellished with gold satin ribbon before layering onto purple card. I've made a gift pocket on the right hand side of the card to insert the bookmark. I have used  a piece of black card for the bookmark & spitzed over the stencil with Metallic Silver & Bright Gold Memory Memory Mists which as you can see produce some beautiful  vey different colour effects on the black card. Ribbons & dragonfly & butterfly Sparkers finish off the effect.